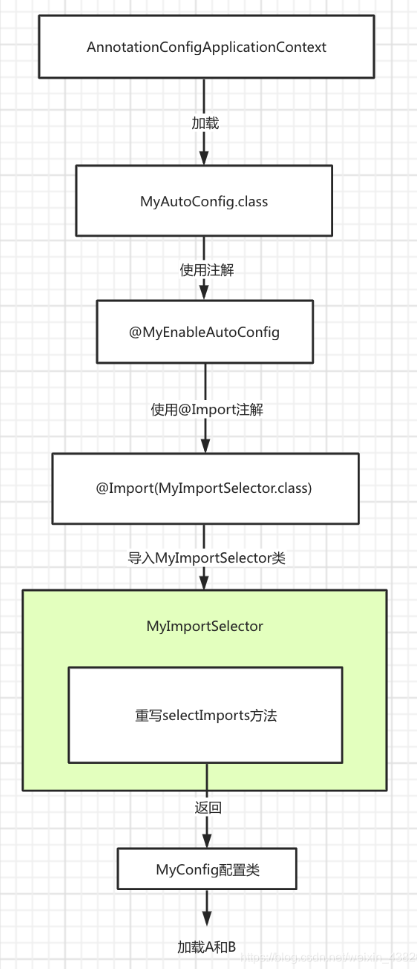
 Spring Boot 自动装配简易理解
# 预热
@Data
@NoArgsConstructor
@AllArgsConstructor
public class Person {
    private String name;
    private Integer age;
    private Boolean sex;
}
配置Bean
- 通过配置文件,setter注入
<!-- 手动配置bean对象 -->
<bean id="person" class="pojo.Person">
    <property name="name" value="dzzhyk"/>
    <property name="age" value="20"/>
    <property name="sex" value="true"/>
</bean>
- 通过配置文件,构造器注入
<!-- 使用构造器 -->
<bean id="person" class="pojo.Person">
    <constructor-arg index="0" type="java.lang.String" value="dzzhyk" />
    <constructor-arg index="1" type="java.lang.Integer" value="20"/>
    <constructor-arg index="2" type="java.lang.Boolean" value="true"/>
</bean>
- 通过注解,属性注入
@Component
public class Person {

    @Value("dzzhyk")
    private String name;
    @Value("20")
    private Integer age;
    @Value("true")
    private Boolean sex;
}
测试以上三种方案,都可以获得Bean
public class TestVersion {
    @Test
    public void test(){
        ApplicationContext ac = new ClassPathXmlApplicationContext("applicationContext.xml");
        Person person = ac.getBean("person", Person.class);
        System.out.println(person);
    }
}
结果
Person(name=dzzhyk, age=20, sex=true)
# 再预热
扩展一下这个类
public class Car {
    private String brand;
    private Integer price;
}

public class Dog {
    private String name;
    private Integer age;
}

public class Person {
    private String name;
    private Integer age;
    private Boolean sex;
    private Dog dog;
    private Car car;
}
1. 基于XML配置
<bean id="person" class="pojo.Person">
    <property name="name" value="dzzhyk"/>
    <property name="age" value="20"/>
    <property name="sex" value="true"/>
    <property name="dog" ref="dog"/>
    <property name="car" ref="car"/>
</bean>

<bean id="dog" class="pojo.Dog">
    <property name="name" value="旺财"/>
    <property name="age" value="5" />
</bean>

<bean id="car" class="pojo.Car">
    <property name="brand" value="奥迪双钻"/>
    <property name="price" value="100000"/>
</bean>
使用ClassPathXmlApplicationContext容器
/**
 * 使用XML配置
 */
public class TestVersion1 {
    @Test
    public void test(){
        ClassPathXmlApplicationContext ca = new ClassPathXmlApplicationContext("applicationContext.xml");
        Person person = ca.getBean("person", Person.class);
        System.out.println(person);
    }
}
2. 基于配置类配置
@Configuration
@ComponentScan
public class PersonConfig {

    @Bean
    public Person person(Dog dog, Car car){
        return new Person("dzzhyk", 20, true, dog, car);
    }

    @Bean
    public Dog dog(){
        return new Dog("旺财", 5);
    }

    @Bean
    public Car car(){
        return new Car("奥迪双钻", 100000);
    }
}
使用AnnotationConfigApplicationContext容器
/**
 * 使用JavaConfig配置
 */
public class TestVersion2 {
    @Test
    public void test(){
        AnnotationConfigApplicationContext ac = new AnnotationConfigApplicationContext(PersonConfig.class);
        Person person = ac.getBean("person", Person.class);
        System.out.println(person);
    }
}
结果
Person(name=dzzhyk, age=20, sex=true, dog=Dog(name=旺财, age=5), car=Car(brand=奥迪双钻, price=100000))
# BeanDefinition
是描述Spring 容器中Bean的元数据对象,被存放一个map容器中
BeanDefinitionMap<beanName, BeanDefinition>

# BeanDefinition中的属性

重点以下三个成员
private volatile Object beanClass;
private int autowireMode = AUTOWIRE_NO;
private ConstructorArgumentValues constructorArgumentValues;
BeanClass
这个属性定义了这个BeanDefinition 是属于哪个class
autowireMode
自动装配模式
- AUTOWIRE_NO
- AUTOWIRE_BY_NAME
- AUTOWIRE_BY_TYPE
- AUTOWIRE_CONSTRUCTOR
@Component
public class A {
    @Value("我是AAA")
    private String name;
    // A的BeanDefinition开启了自动装配, 才可以使用该为A注入属性
    @Autowired
    private B b;
}
在BeanFactoryPostProcessor中做文章
defA.setAutowireMode(AbstractBeanDefinition.AUTOWIRE_BY_NAME);
constructorArgumentValues
Spring在实例化对象时使用的是对象的默认空参构造器
在BeanFactoryPostProcessor中做文章
ConstructorArgumentValues args = new ConstructorArgumentValues();
// 在BeanDefinition中设置实例化对象时,调用哪个构造函数, 设置构造函数中第i个位置,的值
args.addIndexedArgumentValue(0, "我指定的姓名");
args.addIndexedArgumentValue(1, 20);
defStu.setConstructorArgumentValues(args);
# 自动装配

# ChatGPT
# springboot 自动装配原理
Spring Boot 自动装配是基于 Spring Framework 的自动装配机制,通过使用 @EnableAutoConfiguration 注解来实现。@EnableAutoConfiguration 注解会自动扫描当前类路径下的所有 jar 包,根据约定的规则和条件,自动配置需要的 Bean,并将其注入到 Spring 容器中。
Spring Boot 自动装配的原理可以概括为以下几个步骤:
Spring Boot 在启动时会扫描所有 jar 包,并根据约定的规则和条件,自动配置需要的 Bean。
Spring Boot 会根据当前项目中的依赖关系,优先使用项目中已经存在的 Bean。
Spring Boot 会根据配置文件中的配置,覆盖自动配置的默认值。
Spring Boot 会根据条件判断,决定是否需要自动配置某些 Bean。
Spring Boot 会将所有自动配置的 Bean 注入到 Spring 容器中,供其他组件使用。
Spring Boot 自动装配的规则和条件是由 Spring Boot Starter 模块中的 META-INF/spring.factories 文件中的配置来定义的。该文件中定义了一个或多个自动配置类,每个自动配置类都会根据特定的规则和条件,自动配置相应的 Bean。
在自动装配过程中,如果需要手动配置某些 Bean,可以使用 @Configuration 注解来定义一个配置类,并使用 @Bean 注解来定义需要手动配置的 Bean。手动配置的 Bean 会覆盖自动配置的默认值。
总的来说,Spring Boot 自动装配的原理是在 Spring Framework 的自动装配机制的基础上,通过约定的规则和条件,自动配置需要的 Bean,并将其注入到 Spring 容器中,从而简化了应用程序的开发和部署。
# springboot 自动装配源码分析
Spring Boot 自动装配的源码分析主要涉及以下几个方面:
- @EnableAutoConfiguration 注解的实现
@EnableAutoConfiguration 是 Spring Boot 自动装配的核心注解,它的作用是开启自动装配功能。@EnableAutoConfiguration 注解的实现基于 Spring Framework 的自动装配机制,它会自动扫描当前类路径下的所有 jar 包,根据约定的规则和条件,自动配置需要的 Bean。具体实现可以参考 AutoConfigurationImportSelector 类。
- 自动配置类的实现
自动配置类是实现自动装配功能的关键,它们是根据约定的规则和条件,自动配置需要的 Bean。自动配置类通常使用 @Configuration 注解来标识,并使用 @ConditionalOnClass、@ConditionalOnMissingBean、@ConditionalOnProperty 等条件注解来控制自动配置的行为。具体实现可以参考 Spring Boot Starter 模块中的 META-INF/spring.factories 文件中的配置。
- Spring Boot Starter 的实现
Spring Boot Starter 是一种可复用的、可配置的依赖关系,它可以将多个相关的依赖项打包成一个单独的模块,从而简化应用程序的开发和部署。Spring Boot Starter 的实现通常包括以下几个方面:自动配置类、依赖管理、插件管理、属性配置等。具体实现可以参考 Spring Boot Starter 模块中的 pom.xml 文件和 META-INF/spring.factories 文件中的配置。
- 自动装配的优先级和顺序
在自动装配过程中,Spring Boot 会根据当前项目中的依赖关系,优先使用项目中已经存在的 Bean。如果存在多个自动配置类可以配置同一个 Bean,那么 Spring Boot 会根据自动配置类的优先级和顺序来决定使用哪个自动配置类。具体实现可以参考 AutoConfigurationImportSelector 类中的方法。
总的来说,Spring Boot 自动装配的源码分析需要深入了解 Spring Framework 的自动装配机制和条件注解的使用方法,同时还需要了解 Spring Boot Starter 的实现和自动装配的优先级和顺序。只有在深入了解这些内容的基础上,才能更好地理解和使用 Spring Boot 自动装配功能。
# springboot 中的BeanDefinition怎么理解
在 Spring Boot 中,BeanDefinition 是用来描述 Spring 容器中 Bean 的元数据对象。BeanDefinition 中包含了 Bean 的类名、属性值、构造函数参数值等信息,它定义了 Bean 的类型、作用域、生命周期等属性,是 Spring 容器中 Bean 的重要组成部分。
BeanDefinition 可以通过两种方式进行定义:
通过 XML 配置文件定义 BeanDefinition。
通过 Java 代码定义 BeanDefinition。
在 Spring Boot 中,通常使用 Java 代码来定义 BeanDefinition。可以通过 @Bean 注解、@Component 注解、@Configuration 注解等方式来定义 BeanDefinition。其中,@Bean 注解是最常用的方式,它可以在任何 Java 类中定义 BeanDefinition,并将其注入到 Spring 容器中。
例如,下面是一个使用 @Bean 注解定义 BeanDefinition 的示例:
@Configuration
public class AppConfig {
    @Bean
    public UserService userService() {
        return new UserServiceImpl();
    }
}
在上面的示例中,@Configuration 注解表示该类是一个配置类,@Bean 注解表示该方法返回的对象是一个 Bean。Spring Boot 会根据该 Bean 的类型、作用域、生命周期等属性,创建对应的 BeanDefinition,并将其注入到 Spring 容器中。
总的来说,BeanDefinition 是描述 Spring 容器中 Bean 的元数据对象,它定义了 Bean 的类型、作用域、生命周期等属性,并可以通过 @Bean 注解、@Component 注解、@Configuration 注解等方式进行定义。了解 BeanDefinition 的概念和定义方式,可以更好地理解和使用 Spring Boot 中的 Bean 容器。
# 如何理解BeanDefinition 中的 autowireMode属性
BeanDefinition 中的 autowireMode 属性是用来指定自动装配模式的。自动装配模式指的是 Spring 容器在进行自动装配时,如何确定要注入哪个 Bean。
BeanDefinition 中的 autowireMode 属性有以下几个取值:
AUTOWIRE_NO:不进行自动装配,需要手动指定依赖关系。
AUTOWIRE_BY_NAME:根据 Bean 的名称进行自动装配,要求依赖的 Bean 名称必须和属性名称一致。
AUTOWIRE_BY_TYPE:根据 Bean 的类型进行自动装配,要求依赖的 Bean 类型必须和属性类型一致。
AUTOWIRE_CONSTRUCTOR:通过构造函数进行自动装配,要求依赖的 Bean 类型必须和构造函数参数类型一致。
AUTOWIRE_AUTODETECT:自动检测自动装配模式,根据属性类型和名称进行自动装配。
例如,下面是一个使用 @Autowired 注解进行自动装配的示例:
@Component
public class UserController {
    @Autowired
    private UserService userService;
}
在上面的示例中,@Autowired 注解表示要对 userService 属性进行自动装配。如果 BeanDefinition 中的 autowireMode 属性为 AUTOWIRE_BY_NAME,则需要保证 UserService 的名称和属性名称一致;如果 BeanDefinition 中的 autowireMode 属性为 AUTOWIRE_BY_TYPE,则需要保证 UserService 的类型和属性类型一致。
总的来说,BeanDefinition 中的 autowireMode 属性是用来指定自动装配模式的,它决定了 Spring 容器在进行自动装配时如何确定要注入哪个 Bean。了解 autowireMode 属性的取值和作用,可以更好地理解和使用 Spring Boot 中的自动装配功能。
# BeanDefinition中的ConstructorArgumentValues属性使用方式
BeanDefinition 中的 ConstructorArgumentValues 属性是用来指定 Bean 的构造函数参数的。它可以通过以下两种方式进行设置:
- 使用 index 属性指定构造函数参数的位置,使用 value 属性指定构造函数参数的值。例如:
<bean id="user" class="com.example.User">
    <constructor-arg index="0" value="张三"/>
    <constructor-arg index="1" value="30"/>
</bean>
在上面的示例中,index 属性指定了构造函数参数的位置,value 属性指定了构造函数参数的值。
- 使用 name 属性指定构造函数参数的名称,使用 ref 属性指定构造函数参数的引用。例如:
<bean id="user" class="com.example.User">
    <constructor-arg name="name" value="张三"/>
    <constructor-arg name="age" ref="ageBean"/>
</bean>

<bean id="ageBean" class="java.lang.Integer">
    <constructor-arg value="30"/>
</bean>
在上面的示例中,name 属性指定了构造函数参数的名称,value 属性指定了构造函数参数的值,ref 属性指定了构造函数参数的引用。
除了 XML 配置文件之外,还可以使用 Java 代码来设置 ConstructorArgumentValues 属性。例如:
@Configuration
public class AppConfig {
    @Bean
    public User user() {
        ConstructorArgumentValues constructorArgumentValues = new ConstructorArgumentValues();
        constructorArgumentValues.addIndexedArgumentValue(0, "张三");
        constructorArgumentValues.addIndexedArgumentValue(1, 30);
        return new User(constructorArgumentValues);
    }
}
在上面的示例中,使用 ConstructorArgumentValues 对象来设置构造函数参数的值,addIndexedArgumentValue() 方法指定了构造函数参数的位置和值。
总的来说,ConstructorArgumentValues 属性是用来指定 Bean 的构造函数参数的,可以通过 XML 配置文件或 Java 代码进行设置。了解 ConstructorArgumentValues 的使用方式,可以更好地理解和使用 Spring Boot 中的 Bean 容器。
# SpringApplication中的setListeners怎么理解
SpringApplication 中的 setListeners() 方法是用来设置 Spring Boot 应用程序的监听器的。Spring Boot 应用程序的监听器是一种特殊的 Bean,它可以监听 Spring Boot 应用程序的生命周期事件,并在事件发生时执行相应的逻辑。
Spring Boot 应用程序的监听器可以分为以下几种类型:
ApplicationStartingEvent 监听器:在 Spring Boot 应用程序启动之前执行。
ApplicationEnvironmentPreparedEvent 监听器:在 Spring Boot 应用程序环境准备完成之后执行。
ApplicationPreparedEvent 监听器:在 Spring Boot 应用程序准备完成之后执行。
ApplicationStartedEvent 监听器:在 Spring Boot 应用程序启动完成之后执行。
ApplicationReadyEvent 监听器:在 Spring Boot 应用程序准备好接收请求之后执行。
ApplicationFailedEvent 监听器:在 Spring Boot 应用程序启动失败时执行。
使用 setListeners() 方法可以向 Spring Boot 应用程序添加自定义的监听器,以实现一些特定的业务逻辑。例如,下面是一个使用 setListeners() 方法添加 ApplicationStartedEvent 监听器的示例:
@SpringBootApplication
public class MyApp {
    public static void main(String[] args) {
        SpringApplication app = new SpringApplication(MyApp.class);
        app.setListeners(Collections.singletonList(new MyApplicationStartedEventListener()));
        app.run(args);
    }
}
在上面的示例中,使用 setListeners() 方法向 Spring Boot 应用程序添加了一个自定义的 ApplicationStartedEvent 监听器 MyApplicationStartedEventListener。
总的来说,setListeners() 方法是用来设置 Spring Boot 应用程序的监听器的。了解 setListeners() 方法的使用方式和 Spring Boot 应用程序的监听器类型,可以更好地实现一些特定的业务逻辑。
# SpringApplication中的setInitializers怎么理解
SpringApplication 中的 setInitializers() 方法是用来设置 Spring Boot 应用程序的初始化器的。Spring Boot 应用程序的初始化器是一种特殊的 Bean,它可以在 Spring Boot 应用程序启动之前执行一些初始化逻辑。
Spring Boot 应用程序的初始化器可以分为以下几种类型:
ApplicationContextInitializer:在 Spring 应用程序上下文创建之前执行。
ApplicationListener:在 Spring Boot 应用程序启动之前执行。
使用 setInitializers() 方法,可以向 Spring Boot 应用程序添加自定义的初始化器,以实现一些特定的业务逻辑。例如,下面是一个使用 setInitializers() 方法添加 ApplicationContextInitializer 的示例:
@SpringBootApplication
public class MyApp {
    public static void main(String[] args) {
        SpringApplication app = new SpringApplication(MyApp.class);
        app.setInitializers(Collections.singletonList(new MyApplicationContextInitializer()));
        app.run(args);
    }
}
在上面的示例中,使用 setInitializers() 方法向 Spring Boot 应用程序添加了一个自定义的 ApplicationContextInitializer。
总的来说,setInitializers() 方法是用来设置 Spring Boot 应用程序的初始化器的。了解 setInitializers() 方法的使用方式和 Spring Boot 应用程序的初始化器类型,可以更好地实现一些特定的业务逻辑。
